The app engine is one of the best services offered by the Google Cloud Platform. Building and deploying apps on the App engine is very straight forward. You don’t have to worry about the provisioning and maintenance of the instances. I think the App engine is one of the early adopters of the serverless architecture. It has excellent support for programming languages like Python, PHP, Go, Java, Ruby, and nodejs.
When building a web application, we want to send a response as soon as possible. But there are some background tasks we need to perform like database updates, sending emails, etc. We need a queuing system to handle a load of such async tasks efficiently. Google Cloud has a great product to offer, which is Cloud Tasks. It is a scalable and fully managed distributed task queue with the power of rate and retries controls. It gives us immense flexibility to handle our async tasks. Principal benefits of Cloud Tasks are -
- We can build more responsive applications.
- We can decouple and scale Microservices
- Easily manage resource consumption
- And the last but not the least, we can handle releases and incidents gracefully.
Learn more about it on the official website - https://cloud.google.com/tasks/.
In this blog, we will see how to create and handle the async tasks with App Engine and Cloud Tasks. First, download cloud SDK if you haven’t by following this installation guide for your OS.
To access the Cloud Tasks service using Cloud Tasks API, you must have a project that contains an App Engine app located in a specific region. Let’s create a brand new project. I am naming mine cloudtaskdemo. After that, create an App Engine app with a nodejs standard environment. The location selected will serve as the LOCATION_ID parameter for your Cloud Tasks requests, so make a note of it. Now let’s create our queue. If you have multiple projects then, you can see all the projects by command -
gcloud projects listNow to set our demo project as a current project in cloud SDK, run the following command -
gcloud config set project <yourprojectname>
# e.g -
# gcloud config set project cloudtaskdemo
Now let’s create our cloud task queue. Run -
gcloud tasks queues create my-queueSay yes, if asked to enable google API. To check our queue, run command -
gcloud tasks queues describe my-queueYou must see an output like -
name: projects/cloudtaskdemo/locations/us-central1/queues/my-queue
rateLimits:
maxBurstSize: 100
maxConcurrentDispatches: 1000
maxDispatchesPerSecond: 500.0
retryConfig:
maxAttempts: 100
maxBackoff: 3600s
maxDoublings: 16
minBackoff: 0.100s
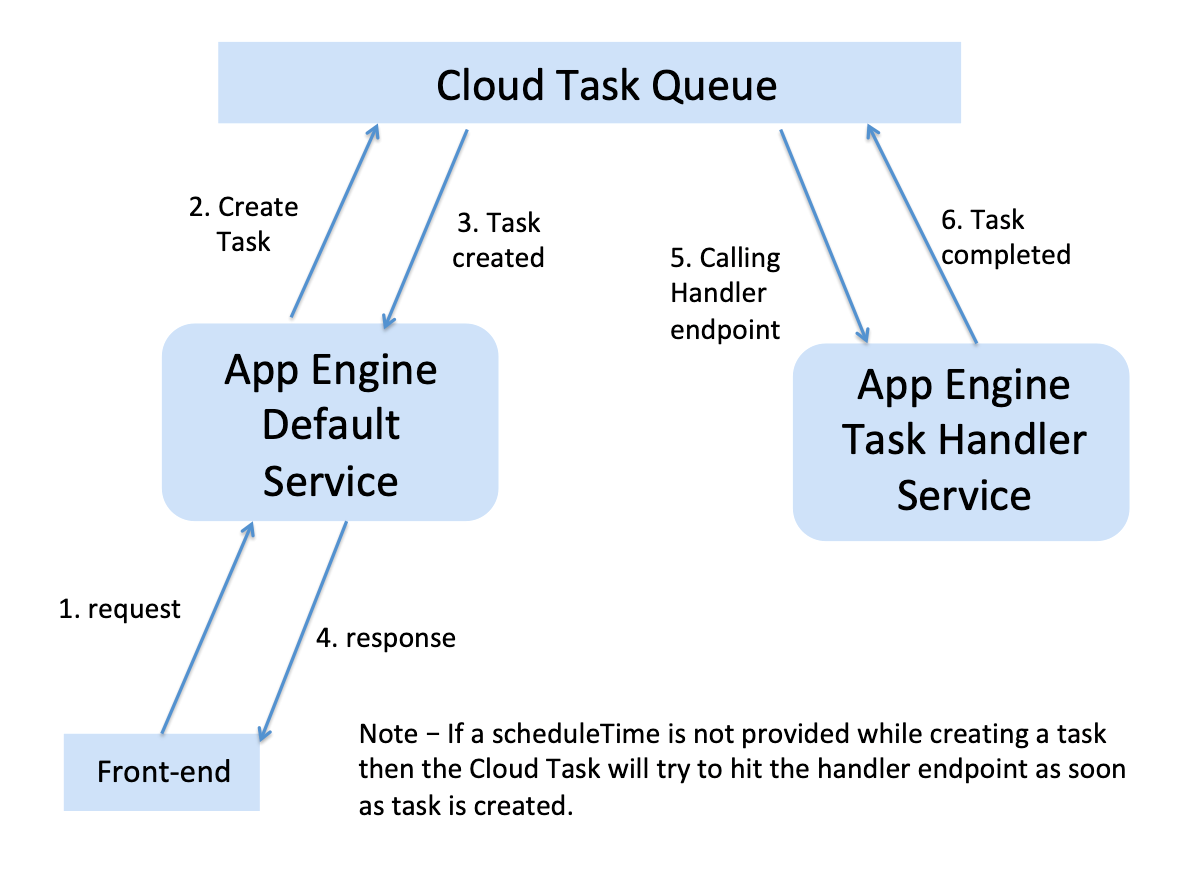
state: RUNNINGNow that we have created our queue let’s write some nodejs code. We will create two App engine services. The first one will be a default service that will add tasks to the queue. The other one will be a taskHandler service that will handle the tasks.
Let’s create a new directory. Create two directories named default and taskHandler inside it. Now run following commands -
cd default && npm initSelect all defaults if you want but add entry point to server.js instead of index.js and create a file named server.js.
Let’s install required packages -
npm install -s express body-parser @google-cloud/tasksNow in server.js of the default service -
// Imports the Google Cloud Tasks library.
const {CloudTasksClient} = require('@google-cloud/tasks');

// Instantiates a client.
const client = new CloudTasksClient();

const express = require('express');
const app = express();
const bodyParser = require('body-parser');

// replace with your values
const project = 'cloudtaskdemo';
const queue = 'my-queue';
const location = 'us-central1';

// Construct the fully qualified queue name.
const parent = client.queuePath(project, location, queue);


app.get('/createTask', async (req, res) => {
    const payload = {
        name : 'The mandalorian',
        job : 'collect bounty'
    }

    // We will create this task-handler service and handleTask route later.
    const task = {
        appEngineHttpRequest: {
          httpMethod: 'POST',
          appEngineRouting: {
            service : 'task-handler'
          },
          relativeUri: '/handleTask',
          body: Buffer.from(JSON.stringify(payload)).toString('base64')
        },
    };
    // create a request object
    const request = {
        parent: parent,
        task: task,
    };
    console.log('Sending app engine task:');
    console.log(task);
    // Send create task request.
    const [response] = await client.createTask(request);
    const name = response.name;
    console.log(`Created task ${name}`);
    res.send({"response":response});


});

// Basic route to verify app is serving
app.get('/', (req, res)=>{
    res.send("default working");
});


const port = process.env.PORT || 8080;

app.listen(port, ()=>{
    console.log("###### Bravo!!! default service running on ",port);
});
We have our default service ready. Let’s create an app.yaml file and deploy our service to the app engine.
app.yaml of the default service -
runtime: nodejs10To deploy, run -
gcloud app deployLet’s check if our app is working properly or not. Open a browser and go to the link which we see after the deployment in the terminal. Something like https://<yourProjectName>.appspot.com. You will see a response 'default working'.You can stream logs from the command line by running:
gcloud app logs tail -s defaultIts time to create our task hander service now. Open a new terminal and run -
cd taskHandlerRepeat the same process.
npm initSelect all defaults if you want but add entry point to server.js instead of index.js and create a file named server.js. Download required packages -
npm install -s body-parser expressNote that we don’t require @google-cloud/tasks package in the handler service. It is just a normal express server with POST endpoint to handle the task.
server.js of task-handler service -
const express = require('express');
const bodyParser = require('body-parser');


const app = express();

app.enable('trust proxy');

// If you add this filter, you can assure that the result will be correctly parsed
// Idea taken from https://stackoverflow.com/questions/54211890/nodejs-set-body-to-google-cloud-task-queue/54220955
const rawBodySaver = function (req, res, buf, encoding) {
    if (buf && buf.length) {
      req.rawBody = buf.toString(encoding || 'utf8');
    }
}
// Use above defined filter with body-parser.
app.use(bodyParser.json({ verify: rawBodySaver }));
app.use(bodyParser.urlencoded({ verify: rawBodySaver, extended: true }));
app.use(bodyParser.raw({ verify: rawBodySaver, type: function () { return true } }));


app.post('/handleTask', (req, res) => {
    console.log("X-AppEngine-QueueName is -->> ", req.header('X-AppEngine-QueueName'));
    const bodyData = JSON.parse(req.rawBody);
    console.log(`%%%%  Received task with payload - name : ${bodyData.name} & Job - ${bodyData.job}`  );
    // we need to send this status to tell cloud task about the completion of task.
    res.sendStatus(200);
});

const port = process.env.PORT || 8080;
app.listen(port, ()=>{
    console.log("********** Bravo!!! Handler service is running on ",port);
});
We have defined a custom filter function for parsing the payload from req.body. To tell the Cloud Tasks that we have completed our task, we must send an HTTP response code (200-299) to the Cloud Tasks service. Note from docs -
App Engine itself returns a 503 status code when instances are overloaded or otherwise unavailable. The Task service responds to this by slowing delivery from queues to handlers, to avoid making the problem worse. If you wish to trigger a retry intentionally, use any status code other than 2xx or 503.
Create an app.yaml file in the taskHandler directory.
app.yaml of the task-handler service -
runtime: nodejs10

service: task-handler
We are explicitly mentioning the service name task-handler. If a service name is not provided in the app.yaml file by us then, the app engine deploys it as a default service. Thats what we did while deploying the default service code to the app engine. Deploy task handler service by using the command -
gcloud app deployTo stream logs from the command line, run:
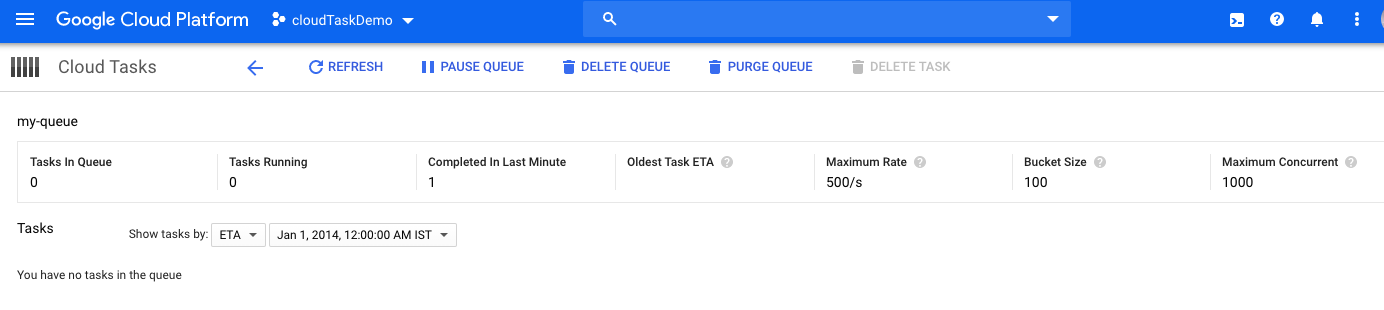
gcloud app logs tail -s task-handlerBoth the services are up and running. Let’s check our tasks. Go to the Cloud Tasks tab of Cloud Console and select my-queue from the queue list. Here we will see Tasks in Queue, Tasks Running, Completed In Last Minute, and so on. Hit the URL https://<yourProjectName>.appspot.com/createTask in your browser.
You will see an output like -

Go to the Cloud Tasks tab of Cloud Console and click on refresh. You will see 1 in Completed In Last Minute.
Now let’s check the log trails. Check out both the terminals. You will see an output similar to following in the default service’s log trails.

The taskHandler service’s log trails will be like -

We have our task handler working but how to secure it so that only Cloud Task can hit the endpoint. The requests incoming from Cloud Tasks will have the X-AppEngine-QueueName header. We will create a simple middleware that will validate the X-AppEngine-QueueName present in the header equal to our queue name. Now the code looks like -
server.js of task-handler service -
const express = require('express');
const bodyParser = require('body-parser');


const app = express();

app.enable('trust proxy');

// If you add this filter, you can assure that the result will be correctly parsed
// Idea taken from https://stackoverflow.com/questions/54211890/nodejs-set-body-to-google-cloud-task-queue/54220955
const rawBodySaver = function (req, res, buf, encoding) {
    if (buf && buf.length) {
      req.rawBody = buf.toString(encoding || 'utf8');
    }
}
// Use above defined filter with body-parser.
app.use(bodyParser.json({ verify: rawBodySaver }));
app.use(bodyParser.urlencoded({ verify: rawBodySaver, extended: true }));
app.use(bodyParser.raw({ verify: rawBodySaver, type: function () { return true } }));

// secure our endpoints
const secureMiddleware = async (req, res, next) => {
    if(req.header('X-AppEngine-QueueName') != 'my-queue'){
        console.log("No X-AppEngine-QueueName is specified");
        return res.status(403).send('Unauthorized');
    }else{
        next();
        return;
    }
};

app.use(secureMiddleware);


app.post('/handleTask', (req, res) => {
    console.log("X-AppEngine-QueueName is -->> ", req.header('X-AppEngine-QueueName'));
    const bodyData = JSON.parse(req.rawBody);
    console.log(`%%%%  Received task with payload - name : ${bodyData.name} & Job - ${bodyData.job}`  );
    // we need to send this status to tell cloud task about the completion of task.
    res.sendStatus(200);
});

const port = process.env.PORT || 8080;
app.listen(port, ()=>{
    console.log("********** Bravo!!! Handler service is running on ",port);
});
Deploy again by running :
gcloud app deployTo check it, either use postman or run -
curl -X POST \
  https://task-handler-dot-<yourappname>.appspot.com/handleTask
You will see an error message.
We have created and handled async tasks from App Engine using Cloud Tasks. We have secured our App Engine handler so that only Cloud Task will be able to hit the endpoint. We have decoupled tasks handler service from our default service. This whole system is serverless, fully managed and scalable. You can create multiple queues, tasks, and multiple handlers in your app. Note that we have not looked into the Cloud Tasks features like rate limit, retryConfig and so on. Cloud Tasks gives us great flexibility to handle such async tasks. Please check out the official docs about how to use these features. After testing, don’t forget to delete the project. That’s it. Happy Coding:)
Github repo - https://github.com/darshanDevrai/appEngineCloudTasks